Friday, December 08, 2006

6x18 camera with curved film plane

Well, at last I've stolen a few evenings to build yet another camera - a 6x18 panoramic camera for 120 rollfilm. I've been waiting to build this camera for a while....

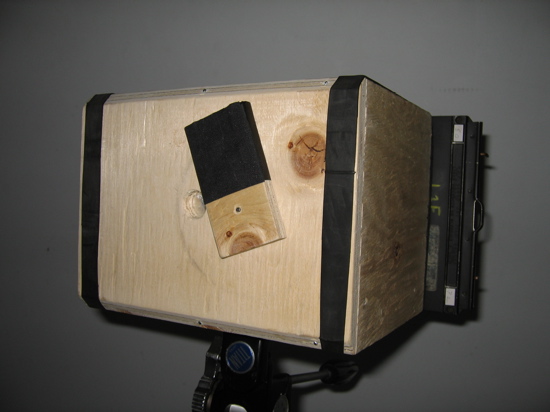
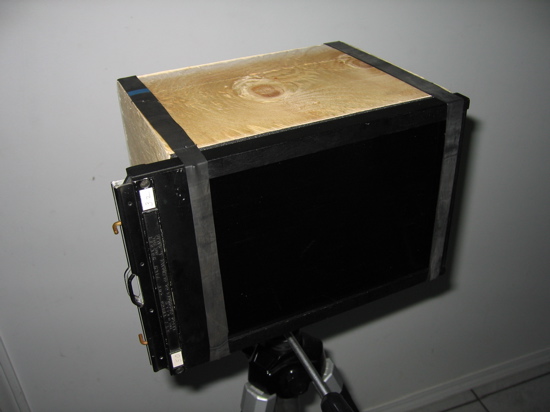
I decided that aluminum wasn't going to be rigid enough, so I chose 1/8 inch ABS sheeting instead. This summer when I fiberglassed our deck I came across this material at the fiberglass supply store in the form of offcuts - about 1 foot square, and 50 cents per sheet. I may even use ABS cement for the next one - this one was a trial run.


Getting started. One nice thing about ABS is that it cuts very nicely on a table saw.


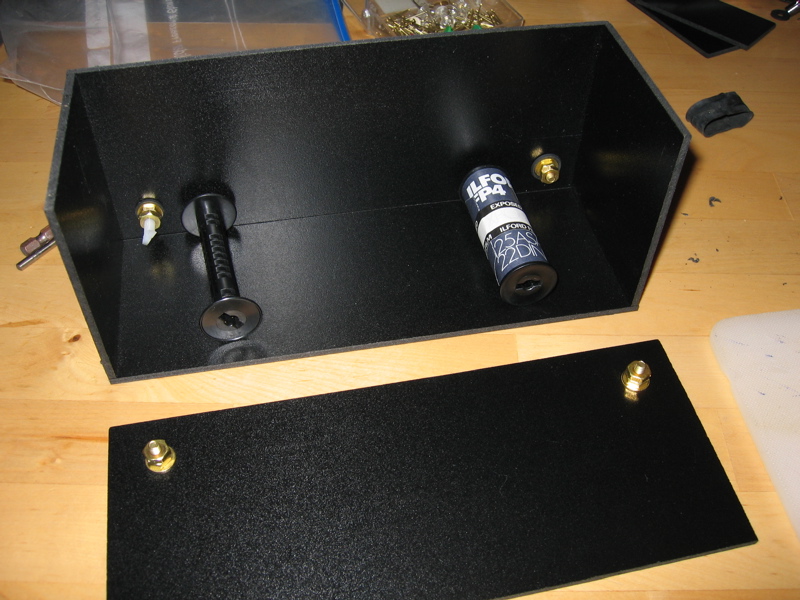
Adding hardware and the dividers that will eventually support the curved film guide. If you've followed my other cameras like the homemade folder you'll notice some familiar design elements.


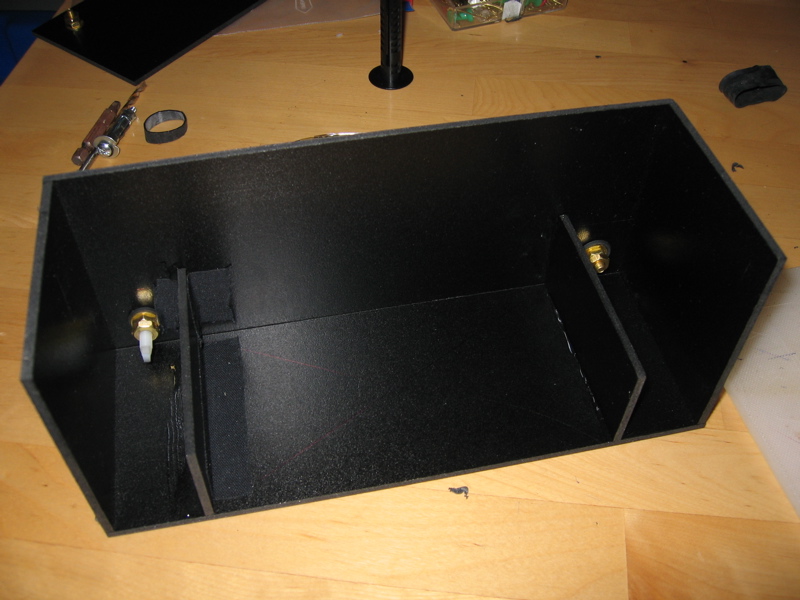
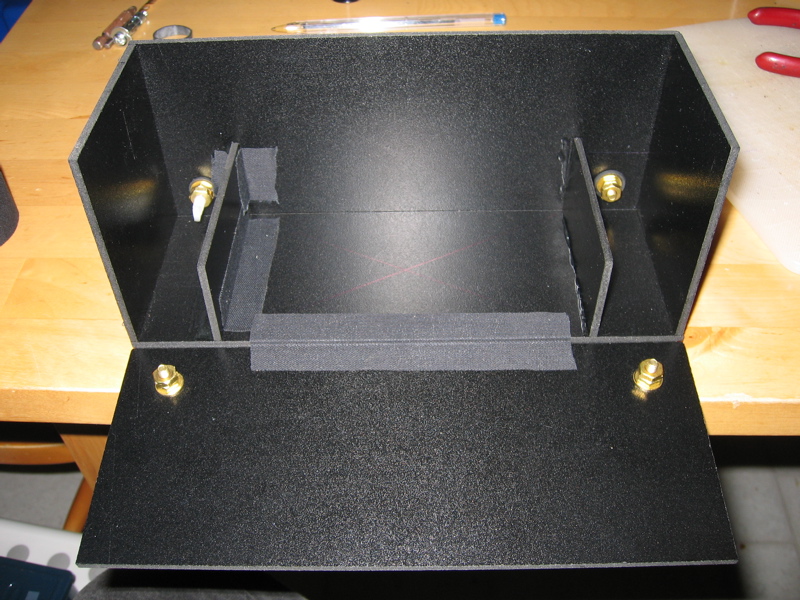
Adding the bottom plate. It swings down to allow loading of the spools. Hockey tape "bellows" keep things light-tight but allow for a flexible joint.

Detail of a bellows and the finished bottom plate (less the tripod mount added later).


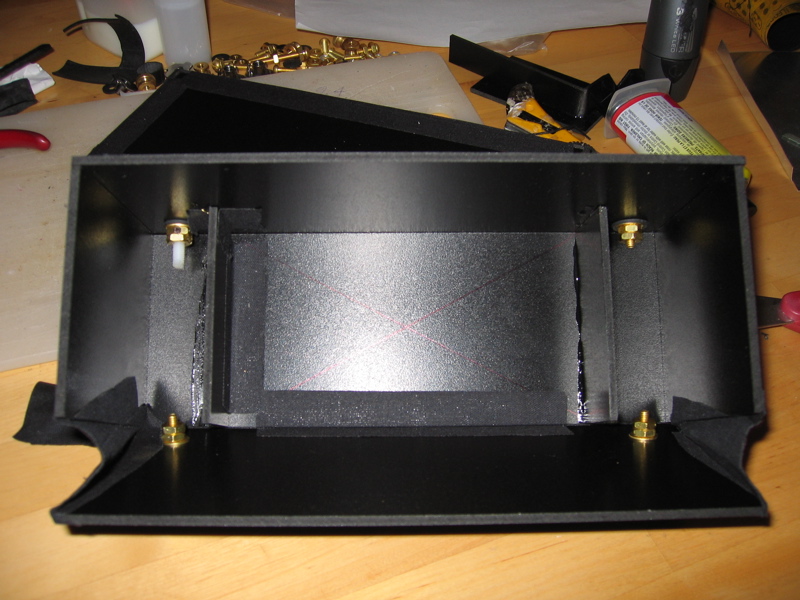
Aluminum (yes! it has aluminum!) braces hold the dividers steady. I would have used ABS cement but it smells - and it's darn cold outside right now...


The film guide cut out and ready for installation.


Film guide installed. The tension of the flexed aluminum is enough to keep it in the desired curve. The "focal" radius is 85mm.


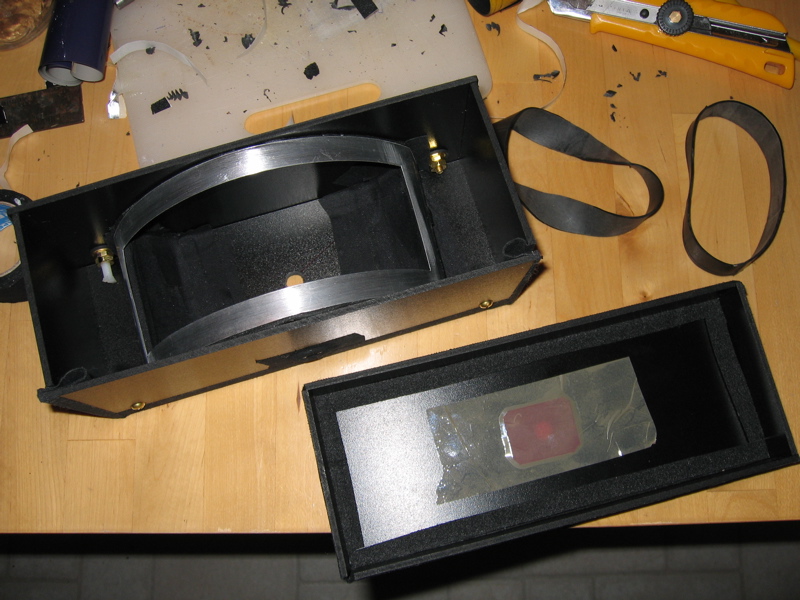
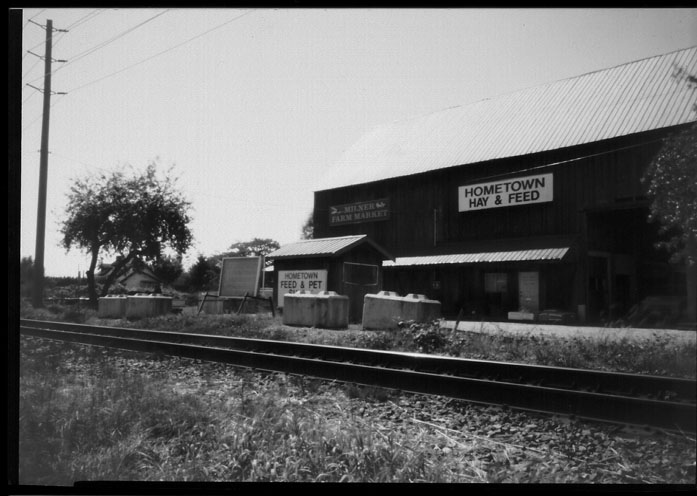
The back of the camera is simply a shallow ABS box that fits snugly over the camera and is lined with weatherstripping foam. The back has a red window for advancing film (for 6x18 with a centred window, start with "2" and then progress to 5, 8, et cetera).


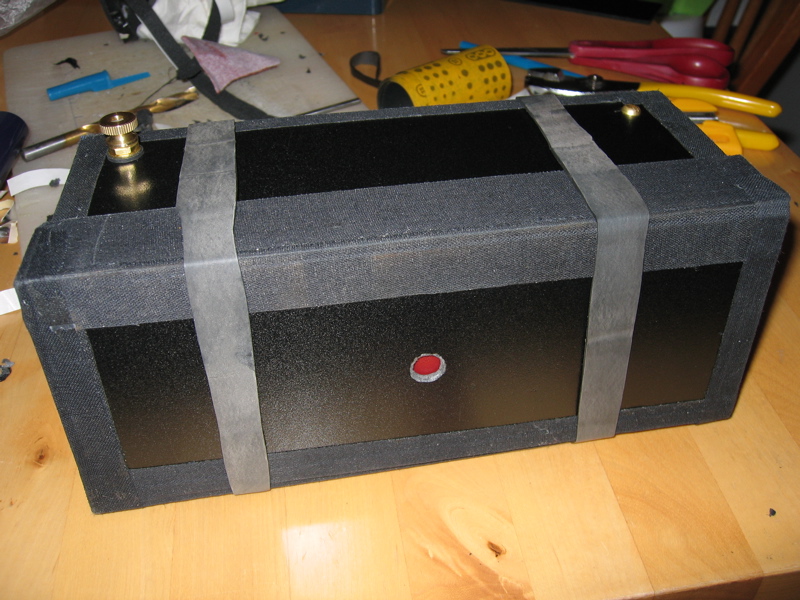
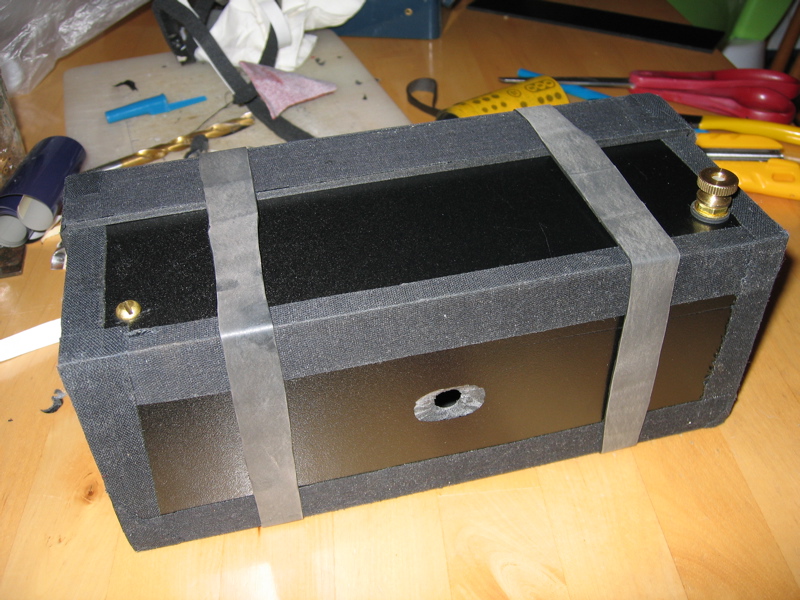
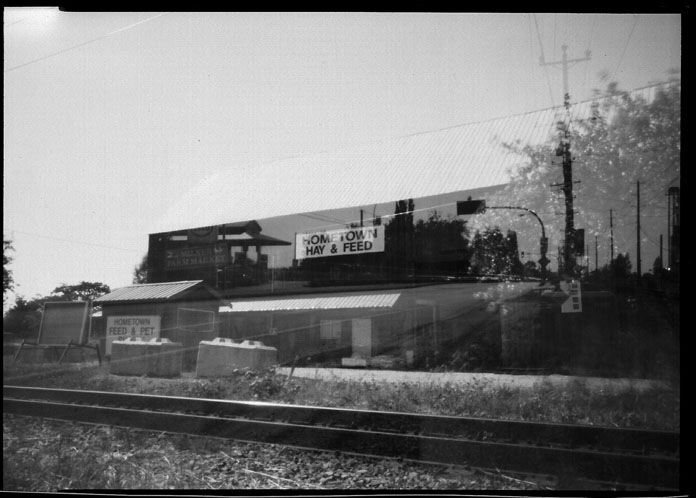
The assembled camera, with sections of motorcycle innertube as industrial-strength elastics. All that remains is to install a pinhole and build a shutter (and get some 120 film!!) Stay tuned!

Friday, December 01, 2006

A note of celebration


Some of you are probably wondering if I've fallen off the face of the earth! Well, not quite, but close- it's near the end of the fall semester and my workload is large at the moment.

Still, there's time for a quick post - one of my images (above) was selected for inclusion in the f295 yearly calendar- it's from my Milner series.

I'm hoping to get a wee bit of pinholing in over the Christmas break, before the spring semester swallows me...

Sunday, July 30, 2006

More pictures from the 5x7 camera

I was out at UBC last week and took some more shots with the new 5x7 camera. It's performing very well. This camera (without the filter) is now up for sale on ebay - click the link on the sidebar and you'll see the auction.

The pictures are of the new UBC life sciences centre, and of the replica statue of the "Godess of Democracy" - the icon created by the Tiannemen Square protesters in China before the tanks rolled in. Democracy is a gift...


90 sec exposure on Ilford MG IV paper, internal yellow filter. A nice demonstration of the sharpness of the homemade 0.50mm pinhole.


as above, but 3 minute exposure + slight levels nudge in PS

Tuesday, July 25, 2006

New camera and more from Milner

My table saw is now finally set up and running. While I have used it for construction purposes already (I'm rennovating our deck right now) my first "project" using the saw was a new plywood camera for 5x7 film holders. I wanted to start using paper negatives (cheaper!) and 5x7 is a nice large size. It's also very convenient to use 5x7 paper - all that is required is to trim off about 2mm from one length and it'll slip right into the holder. Easy!

There are some very dedicated and excellent paper shooters on f295 - people like bino, JoeVanCleave and Steve Irvine (who makes pottery cameras!). I've been inspired by them to try this out.

The other advantage to paper negs (besides cost - where can you get 5x7 sheet film for 20 cents a shot??) is that you can develop by inspection under red light. One downside is that Multigrade paper (which most people use) comes out very contrasty when exposed with a pinhole - basically only black or white, with nary a grey to be seen. I had an idea to try circumvent this drawback, though: using a yellow filter to restrict the contrast. The low contrast Multigrade filters are yellow, so I thought a yellow camera (lens) filter might work too.

The new 5x7 cam: specs are as follows: 150mm FL, 0.50mm pinhole (f300), internal yellow filter over pinhole, threaded 1/4-20 tripod mount (landscape mode), wooden shutter with black paper wrap (old 120 backing paper). Exposures for paper are L O N G - so I felt no need for a cable release shutter.

The back is a simple "open box" design for now, but I will likely add a frame around the rim for the holder later. The rim is lined with black foam weatherstripping to create a light seal with the holder. The inside of the camera is lined with more 120 backing paper - future cameras will simply be painted flat black, but I wanted to recycle the paper...

The film back is held snugly in place with large elastic bands cut as cross sections from a motorcycle innertube.

A handy trick is to use a darkslide tucked under one of the bands as a "lens" shade before opening the shutter to make an exposure.

I've used this cam in my ongoing Milner project (see the previous post). The results are very encouraging, and the yellow filter seems to have done the trick! You can click on the pictures to see a larger version (recommended!).

Here's the farm feed store that the grain elevators from the first Milner post supply. Exposure was ~3 min in bright sun.


I wanted to try some double exposures - here's basically the same image but with a double exposure of the main street overlaid on it. Exposures were about 1.5 minutes each.


Here's another double take of the now derelict Harrington Grocery in Milner. Exposures were also around 1.5 min each.

There's still lots to shoot here, so there will be more to come in future posts!


Thursday, July 20, 2006

A photo from Iowa


I recieved an email and photo from another (repeat) customer, Harry W in Iowa. Harry writes:

I bought two pinholes from you. the first a 75mm focal length gave this photo with the pinhole mounted in an Agfa Speedex in the lens mounting ring....I removed the lens elements and cut the pinhole to fit. I have been displaying images from it at the camera shop where I work. The customers like the quality in an 11x14 print size. I am working on building a panoramic film back 6x12 to fit the 50mm pinhole I got last. Thanks for a really smooth pinhole - it's as sharp as the original agfa apo lens.

Thanks for the great photo and the note, Harry. I'll look forward to seeing how your 6x12 cam works out!

Friday, July 14, 2006

DC-3

The local airport has an airplane museum next to it, and this DC-3 is the pride of the collection. This particular craft, the Spirit of the Skeena, even serviced (and was ultimately abandoned in) my hometown of Terrace, BC. It has now been fully restored.

The day I shot these the clouds were drifting past in a light breeze, creating some interesting, if subtle sky patterns.

Homemade 4x5 camera, 60mm FL, 0.30 mm pinhole on Ilford Delta 100 ASA. Exposures unrecorded.


Click on the pictures to see a larger version.

Wednesday, July 12, 2006

New PayPal Buttons - buy direct

I've now posted PayPal buttons on the sidebar so you can purchase pinholes directly from me, instead of through Ebay. Since this saves me some fees, I've dropped the price a bit as well. You can still use Ebay if you want to, but now you have another option. The buttons are set up for single or multiple orders, and there is a place on the PayPal form to specify what size(s) you want.

I've also posted buttons for the body caps for Canon FD and Pentax K mounts with shipping to the USA/Canada or International for the the rest of the world.

As per usual, items will ship within 2 business days of payment.

Happy pinholing!

Tuesday, July 11, 2006

Milner, B.C.

Lately I've been working on a series of pinhole images of a small farming town that has been nearly swallowed up by the surrounding suburb. This little gem is called Milner, and I cycle though it to get to work out at TWU. This series will likely form the basis for my application for a gallery on f295, if and when I get enough images I like.

These were taken with a converted Foldex 20 (6x9 cm, ~90mm FL, 0.38mm pinhole). There is a farm feed store ("Hometown Hay & Feed") in Milner that services the local farms with grain feed. These shots are of the grain tranfer station/elevators that supply the store. The elevators are supplied by rail cars that use a short spur off of the main line.


I'll post more Milner shots as the portfolio grows...

Monday, July 10, 2006

Aerial pinhole photography - another take on the Flying Pinhole!

Daniel G's work continues to amaze and surprise me. Daniel has long been into aerial photography using RC model planes (with small digital cameras controlled from the ground with servos). More recently, Daniel has taken up pinhole photography (some of his previous projects have been posted here previously). All along I've secretly been hoping that Daniel would combine his two hobbies and make an aerial pinhole camera. Well, Daniel took me up on my offer of a free pinhole and used it to make exactly that. The results are astonishing!

Daniel writes:

Hello,
Here is my first aerial photo pinhole, with the 0,2mm pinhole (the free order).
It is a tram station in the campus of Bordeaux.
The film is HP5 and it was developped for iso1600.


Here is the rc model-plane : wingspan 1m, weight 250g. It is made from polystyrene.


The hand made pinhole camera on the plane


A close up of the shutter with the camera mounted in the plane


A view inside the camera with the film

You can follow Daniel's projects on his own blog here. Thanks Daniel! Amazing stuff! Keep it up!

Thursday, June 15, 2006

Ansco Shur Shot Pinhole Conversion


Here's my latest pinhole project - converting an Ansco Shur Shot box camera. This was even easier than the Foldex 20. The shutter had a single speed and no B setting- but it was easy to install a metal rod that blocks the shutter from firing through - thus converting it to a "B" shutter. As long as you hold the lever down, the shutter stays open; when you let go, it closes. An easy, reliable conversion.

The camera back with exposure guide and cloth tape over the red window.


The inside of the camera with the film cone out. The pinhole is installed up in the recessed hole where the lens was. It's a 0.41 mm hole at ~ 100mm (f245). The pinhole is a beaut - I really took my time on it to make it a nice one.

The film cone with empty take up spool. The camera takes 6x9 cm images on standard 120 roll film, so 8 shots per roll.


Here's the shutter open and a view of the pinhole from the front. I had to turn the flash off, so it's a little blurry.

Here's how to hold the shutter open for long exposures: a rubber band wrapped around the camera and looped over the shutter lever. If you get the tension right you can open or close the shutter and it will stay where you put it- open or closed. Low tech, but the camera ain't exactly high tech anyway.


Here are some test pics:

An old flowerpot on my deck - 30min exposure on ~25 year-old Kodak Panatomic X 32 ASA film (I got two rolls in a mixed lot of stuff I bought locally - it expired in 1984!)


A shot off our back deck...


A blowup to show detail - the pinhole is working fine.

As with the Foldex, it's now on Ebay to fund the film habit... click the "Buy a pinhole" link in the sidebar to see the auction if you're interested!

Daniel's 35mm pinhole camera

Here's Daniel G's latest project: a Zeiss Icarex 35mm SLR now sporting one of my 0.25mm pinholes in place of the Zeiss optics. No comparison, of course! Move over, Carl Z! ;o)

This camera makes a nice companion to Daniel's Agfa Clack (see a previous post). Looks to have been a straightforward conversion. Nice work!

Daniel writes:

Hello, Here are 2 photos of my old IKAREX (Zeiss-Ikon) with your pinhole. The photo test, with a clock, is real size (384ko) : ilford pan-F film, exposure 5s with a spot-light 500w, revelator ilford ID11,1-0.

Très bon sténopé :-)

@+ Daniel


As always, I like to blow up test images ridiculously large to check pinhole performance. This one seems to hold its own just fine - a good pinhole is so important for smaller film formats like 35mm. You could get away with less on 4x5 (not that I do), but a pinhole for 35mm needs to be a good one if it's to handle any level of enlargement.

With all the pinholes I've sold, you'd think I'd get more images. Thanks Daniel! Tell you what - your next pinhole is free of charge! Just email me and tell me what size you'd like and I'll send you one gratis. Maybe it's time you built a 4x5 camera or something, or a tin can camera for photo paper, maybe.

And for all the rest of you with my pinholes out there- let's see your cameras and some shots! :o)

Sunday, June 04, 2006

4x5 wide angle pinhole camera project

Here's my latest build - an aluminum 4x5 pinhole camera for use with standard 4x5 cut film holders. It's a simple and reliable design, and very lightweight. It's made from a single piece of aluminum and joined together with my signature hockey tape construction. The shutter is the standard cable release-activated guillotene style. The camera back has a foam rim under a layer of cloth tape for a light-tight seal against the film back. The film holders are held snugly in place with large rubber bands cut from a motorcycle innertube. It's very low tech, but the camera functions very well. I've also mounted a standard tripod mount on the bottom side in the same way I did for my homemade folder.


The camera has a focal length of 60mm, which is very wide for 4x5 film - about 115 degrees of view (the 35mm equivalent would be an 18 mm fisheye lens). The pinhole is 0.30 mm (f200). I've tested the camera for light tightness with a 6-hour test in hazy sun with a darkslide pulled, and no light leaks were detected.

Here's a test image from the camera - this is the microscope I use when making pinholes. This is a 6 min exposure onto Ilford Multicontrast paper. The abililty to shoot with paper in a 4x5 folder is a nice option - it's cheaper than film, and you can watch the negs develop under a safelight. Then it's a simple matter to scan and invert using Photoshop.


Here's a large blowup of the above image to demonstrate how SHARP this pinhole is. You can see incredible detail and resolution. 0.30 mm is pretty much optimal for 60mm, and I took my time with this pinhole. Seems to have paid off!

This one's on the auction block too. I'll be building another for myself soon anyway. Click on the Ebay link on the sidebar to see my current auctions.