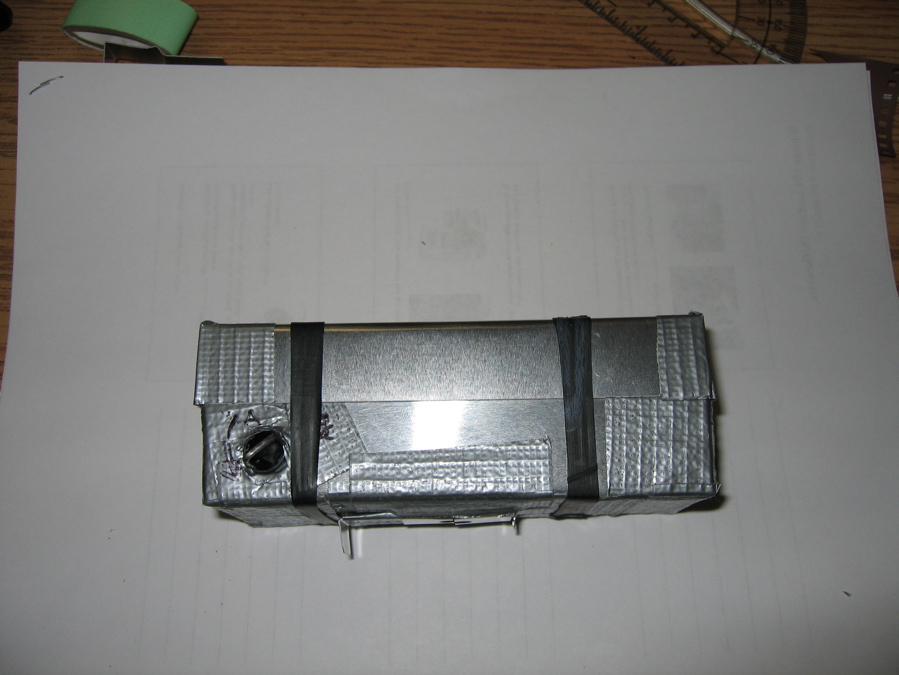
The completed camera ready to go!
Surfing the web looking for pinhole ideas eventually lead me to
this site, which describes how to make a 35mm pinhoe camera from a matchbox. Pretty neat, except I wasn't too keen on all aspects of the design. First off, a 12mm focal length is very wide (I'm not the only one who thinks so, see
here) ; secondly, I prefer to make a more permanent design. Re-taping the light seals for each and every roll doesn't appeal to me. I guess I'm not a matchbox purist.
Still, this really got me thinking. There were also evident flashes of insight here - especially the "frame counter" idea based on a plastic clicker that rides in one of the sprocket hole tracks. Bit of a problem with the fact that in the original design it prevents rewinding, but what a great idea for a low-tech (no-tech?) counter.
Thinking is a dangerous thing, no? I live in fear of the next time my wife says "You know, I've been thinking..." This generally means "I've come up with a great idea for our next home rennovation project that will eventually make you wish you'd been born a nomadic goat herder in Nepal" - no need to reno a tent, except with a patch now and then. But I digress.
I bought a tablesaw a while ago, but I haven't set it up yet - too busy. I was intending to build all sorts of nifty 4x5 film holder pinhole cameras when I set it up, but now I think I'll pass on those, for now. The deal is, I don't have ready darkroom access anymore: the halcyon days of the university photo club (with its forest of 4x5 enlargers) are gone. Yet, the matchbox design is 1-hour photo/scan to digital friendly. Hmm.
It was then I happened to notice a roll of aluminum flashing in the garage. I'd bought it to cover over a hole squirrels were using to get into my attic. They were so annoying, and so adept at getting past my defences, that I actually got up into the attic with my .22 one night when the wife and kids were out, with a
pop-bottle silencer taped over the bore and a flashlight taped to the stock. Lucky for the little buggers I didn't get a clean line of sight. The (more pacifistic) solution proved to be the flashing in the end - folded double and securely screwed over the hole. They'd eaten their way through a thinner piece of aluminum like it was candy. But I'm digressing again.
Since you can only buy flashing in a 30ft roll, there was naturally some left over. When I noticed the roll the other night I thought to myself - "why not build an aluminum matchbox camera?"
So it was that when my wife came home from her weekly Bible study she found me at the kitchen table with aluminum scraps and bits of duct tape scattered everywhere. Her look was not so incredulous as you might think, because she's seen me like this before...
It took a few hours, but eventually I got what I wanted together. Here are some pictures to illustrate my creation, and allow anyone else interested to attempt a similar design. No need to recapitulate the squirrel part - just begin with the roll of flashing (I got mine at Home Depot, in the roofing section).
The first part is to basically build a small box that is exactly the same width as a 35mm film cannister, not including the protruding plastic spool. Then drill two holes in the box to let the spools protrude through. The box should be long enough space the cannisters about 5 cm apart (sorry Americans, it's all metric here. It's about time you adopted this system anyway. I'll never forget the time an American I know blasted Canada for using this weird system that made no sense, that no one else on the planet used, and why didn't we just get in line with everyone else and start using inches and feet like Europe does, etc etc. But I'm digressing again.)
 The camera with cannister holders installed & pinhole mounted, plus the film guide,
and an old staple from a packing crate that is just the right size to fit snugly into the
spools to act as a no-tech winding knob. Note how the corners of the box are not tightly joined together - this is important. You need a bit of flexibility to get the film cannisters into the holes. In order to have a light-proof, flexible seal, tape over the joint when it is slightly splayed open, then cover the joint with aluminum foil, then tape over the foil to make a foil "sandwich." Aluminum foil is lightproof and quite durable when backed with duct tape.
Once you've got the box built, fashion pieces to hold the cannisters in place. (You can score the flashing with a strong utility knife like an Olfa cutter - also from Home Depot - and then bend it back and forth to break it. If you work at it, you can also repeatedly score it and cut it through when needed. BTW, be careful - the edges of the cut flashing will be sharp). The next step is to make a film guide to fit between the cannister holders. I cut mine to the standard 24 x 36mm frame size (sorry, 15/16 inch x 1 5/8 inch) for starters, but I might experiment with other sizes later. A hint on the film guide - install it uncat under tensioned (sacrifical) film, and use a magic marker to color through the sprocket holes. This outlines exactly where the film will ride over the guide, allowing you to accurately cut out the image frame. Then last but not least, build a lid slightly bigger than the camera box itself, again sealing the corners with aluminum foil and duct tape.
 The camera body (pinhole not yet mounted), film guide, and lid. You can
see the traced sprocket holes on the film guide if you look closely.
I light-proofed the camera with strips of foam inside the periphery of the lid. I also tuck loose pieces of foam around the cannisters to hold them in place, and to block light from entering through the holes for the film spools.
Last up was the shutter mechanism. It's a tab of aluminum with a thick piece of inner tube rubber taped to it facing the camera body. I made a track for it with two pieces of aluminum bent to accomodate it, with holes punched in them. The shutter tab also has a punched hole - when aligned with the pinhole this opens the shutter. I designed the shutter to push open in preparation for fitting a cable release to it.
Loading the camera requires installing the film guide, taping the film to the take-up spool (I use a spool designed for bulk loading since it is easy to open), loading the cannisters into their holes, tensioning the film, and then closing the camera body. I use strong elastics to hold everything together - an 8mm wide section of bicycle inner tube makes elastics of an ideal size and strength. Then it's ready to shoot!
 The camera with the film guide installed.
  The film cannisters in place and wedged/lightproofed with foam.
  The finished camera, top view. Look closely and you can see the shutter as well.
  The finished camera, bottom / back view.
  The finished camera, front view, shutter closed.
 The finished camera, front view, shutter open.
 I'll reveal the results of the first test roll in the next posting! Stay tuned...

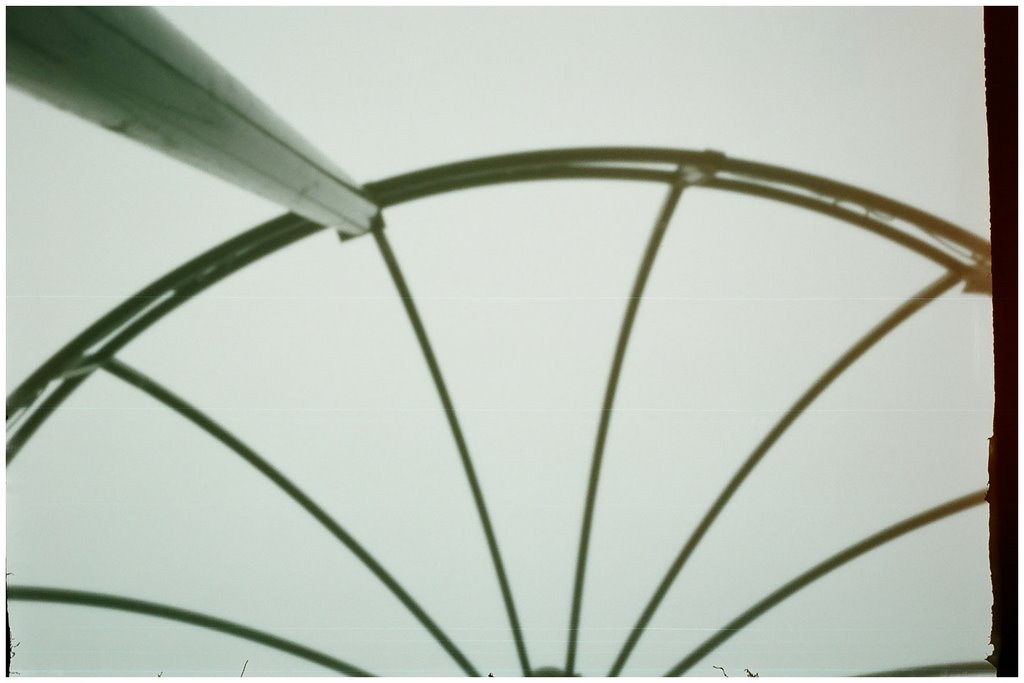
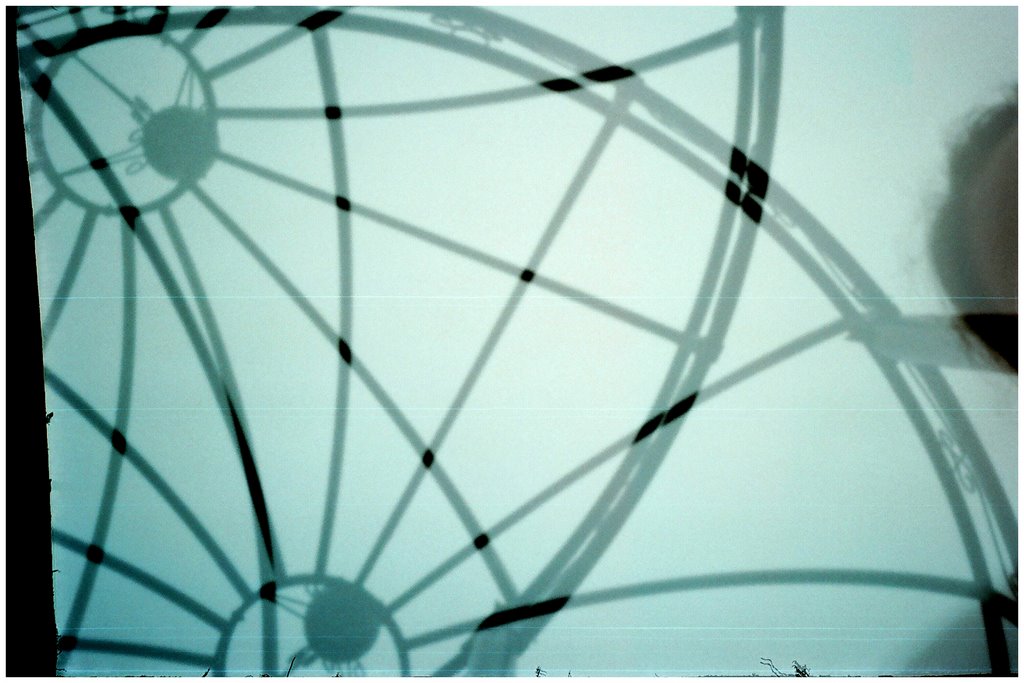
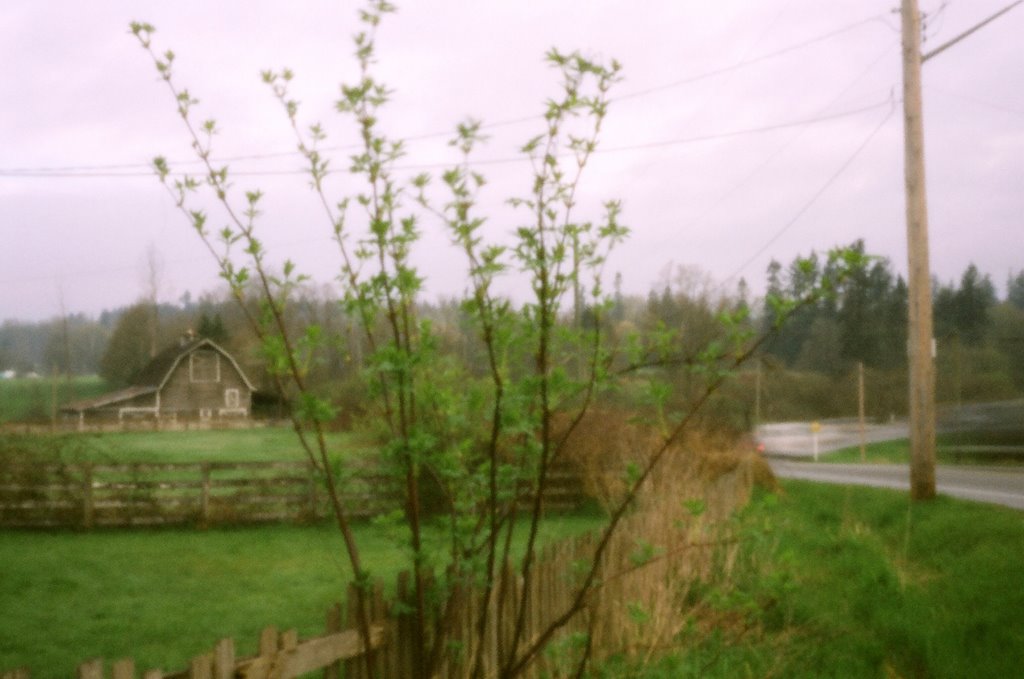
 It was a glorious day here yesterday. This is the sun shining through the trees into my backyard. The wind was blowing, so a lot of the blur is the motion of the leaves & trees. Summer is coming! (Alumi-pin, 4 sec exposure on Fuji print film, f105 {0.280mm pinhole at 30mm}).
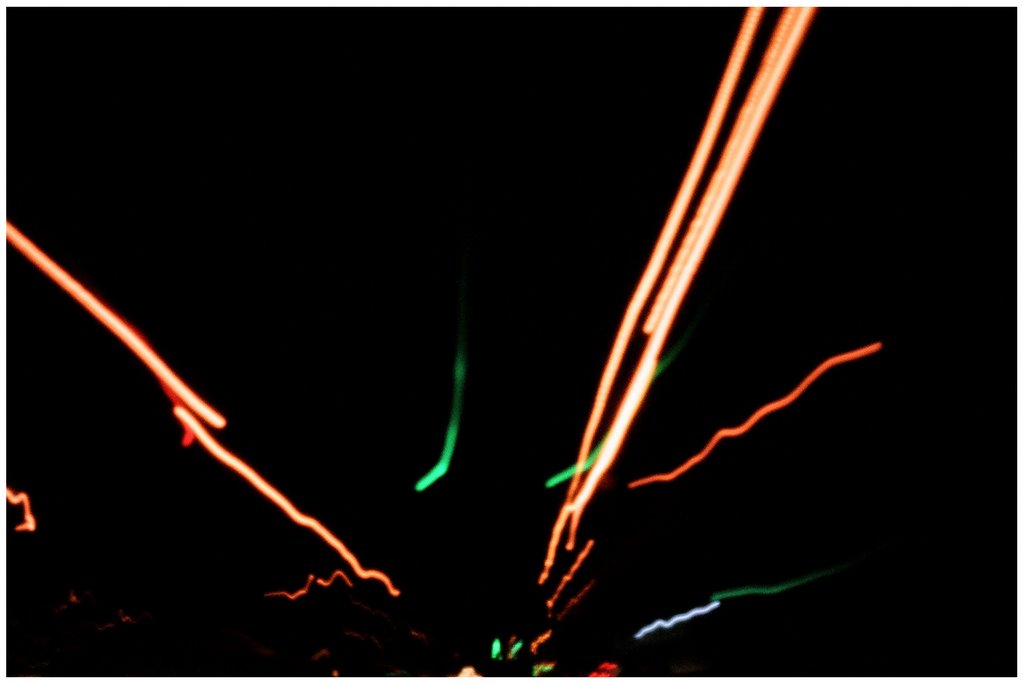
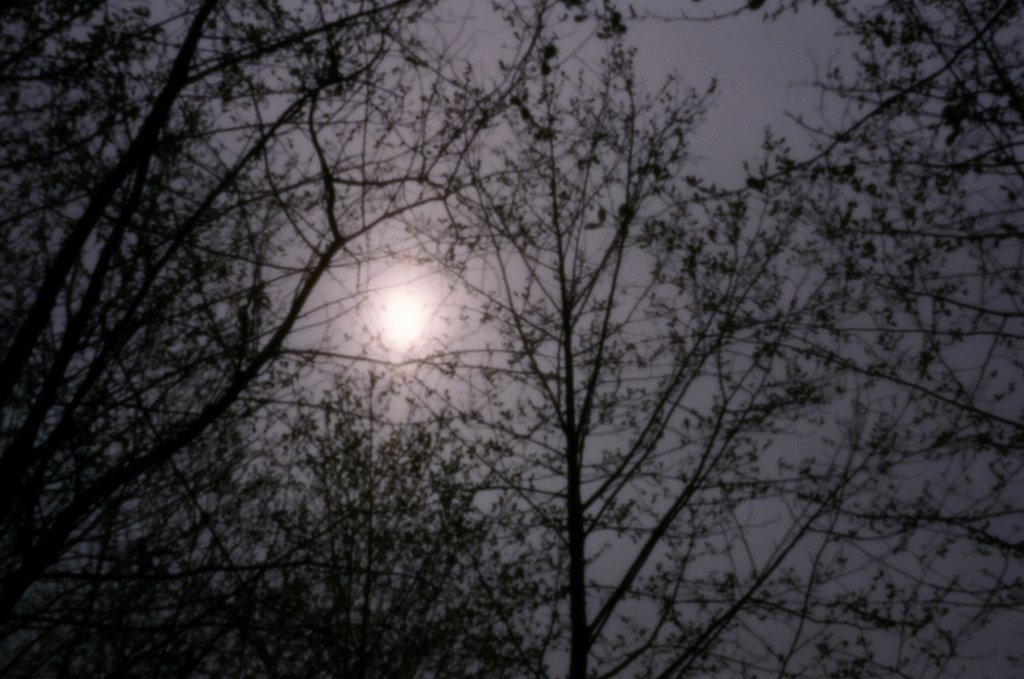
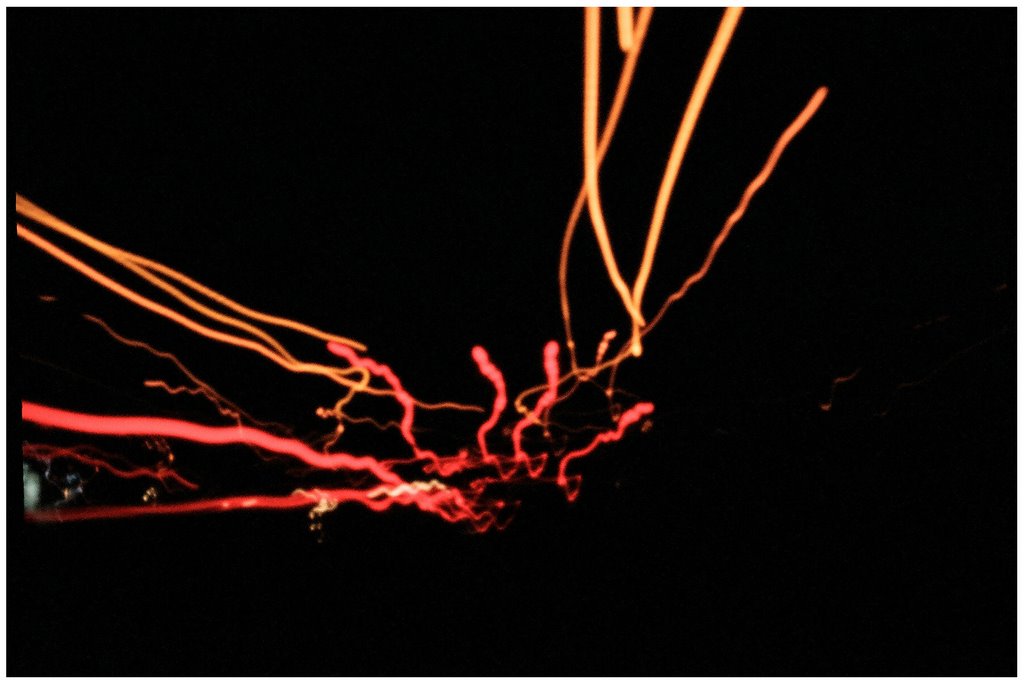 These shots were done by placing the camera on the dashboard of my car while driving at night, and allowing street and car lights to "paint" the film with a long exposure. The cable release made taking these exposures easy. (Alumi-pin, ~ 8 sec exposure on Fuji print film, f105 {0.280mm pinhole at 30mm}).